How to Harvest Black Walnuts and Enjoy Their Delicious Flavor

2023-08-20
How to Harvest Black Walnuts and Enjoy Their Delicious Flavor

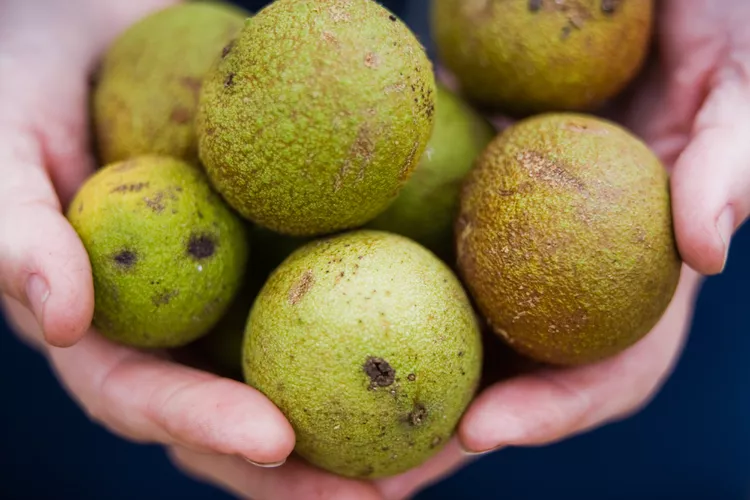
Wondering if you can eat a black walnut from a tree in your yard or foraged from the woods? The answer is yes, but first, you need to know how to harvest black walnuts and crack their tough shells. Use these simple harvesting tips to enjoy these native nuts as a snack or as a flavorful addition to baked goods.

What Are Black Walnuts?

Closely related to the more common English walnut tree, the eastern American black walnut tree (Juglans nigra) grows in Hardiness Zones 4-9, where it produces nuts with a rich, distinct flavor. Rich in healthy fats, fiber, and antioxidants, black walnuts are worth the effort required to harvest the coveted nutmeats.

When to Harvest Black Walnuts

Encased in a thick green husk, ripe black walnuts begin falling from the large, high-branched trees in September and October. Be ready to race the squirrels when it's time to harvest walnuts.

The hefty nuts can dent cars as they fall off the tree and may leave black stains on hard surfaces. Avoid walnut headaches—literally and figuratively—by parking far from this tree’s canopy and gathering the fruit quickly after it falls.

Harvesting Tips

1. Gather black walnuts promptly.

Pick up fallen fruit daily to prevent squirrels from nabbing the nuts first. Gathering from the ground presents no problems, and the nutmeat is not harmed in the fall. Black walnuts still on the tree can also be harvested with the help of a hook on a long pole.

As the walnut husk deteriorates, it turns black and soft. Blackened walnut husks will stain concrete and landscape stone. Gather the walnut fruit immediately to prevent this staining. Protect your hands from the stubborn black substance by wearing gloves when harvesting the nuts.

2. Remove the husk right away.

Shortly after harvest, remove the green husk, or thick outer covering, around a black walnut. If it isn't removed before it turns black and decomposes, the husk will stain the nutmeat and give it an off-flavor. Removing the husks is time-consuming and messy, but the flavor of the nutmeat is worth the labor.

There are two common methods for removing black walnut husks:

  1. Pile the walnuts on a hard surface that you don't mind staining. A gravel driveway or out-of-the-way concrete pad is an option. Then, drive over the nuts repeatedly with a riding lawn mower or a car. The weight of the vehicle cracks the husk without harming the nutmeat. Then, you can peel it off like a citrus peel.
  2. Pound the fruits through holes cut in plywood. Drill a 1 5/8-inch diameter hole in thick plywood. Place the walnut over the hole and use a hammer to force the nut through the opening, shearing off the husk in the process.

After removing the walnut husks, wash the nuts in a large tub of water. Stir the nuts in the tub to dislodge debris and remove lingering husk material. Walnuts with good nutmeat sink to the bottom of the tub, while walnuts with unfilled or undeveloped nutmeat float. Discard all floating walnuts. 

3. Let the nuts cure.

After the husks are removed, black walnuts need to dry or cure in a cool, dry, well-ventilated area for at least two to three weeks to let the nuts’ flavor develop. Spread walnuts in a single layer on trays or screens for maximum air circulation. Protect the drying nuts from squirrels and other critters. Place thoroughly dry nuts in mesh bags or baskets until you are ready to crack them.

4. Have patience when cracking walnut shells.

Cracking open a black walnut shell to retrieve the nutmeat can be a test of endurance and skill. Traditional nutcrackers are no use when it comes to black walnuts. A hammer or a vise that can apply steady pressure is much more likely to reveal the tasty nut. If you opt for a hammer, put the nuts into an old pillowcase first to help contain broken shell pieces.

Soften black walnut shells by soaking them in water for one to two hours. Remove the nuts from the water and keep them moist by storing them in an airtight container overnight. Crack the softened shells the next day. 

After cracking black walnut shells open, use tweezers or needle-nose pliers to pull the nutmeat out of the craggy shells. It is common for bits of shell to break off as you remove the nutmeat. Carefully separate shell bits from the nuts.

Sometimes well-dried walnuts will develop a crack along the shell's seam. If you want to salvage larger pieces of the nuts, look for the shells with this crack. Then carefully use a thin blade such as a pocket knife to split open the two halves.

5. Store black walnuts in the fridge or freezer.

Allow shelled nuts to dry for one to two days at room temperature before transferring them to a sealed container. Store black walnuts in the refrigerator for a month or in the freezer for two years or more.

Frequently Asked Questions

  • What's the best way to use black walnuts?

    Black walnuts can be used the way you would use English walnuts. They make tasty additions to cakes, cookies, quick breads, and your next charcuterie board.

  • What do black walnuts taste like?

    Black walnuts taste similar to English walnuts, but with a more earthy flavor. They can vary from sweet to bitter, depending on how they are processed.

  • Where do black walnuts grow?

    Unlike other nuts, which are grown in groves or orchards, black walnut, the only wild tree nut in the United States, can be found as scattered individual trees or in small groups in central and eastern parts of the United States.

Related Article

How to Plant and Grow Rose of Jericho

How to Plant and Grow Rose of Jericho

Rose of Jericho is a unique houseplant that can survive with minimal water, making it a great option for travelers and forgetful gardeners.
21 Adorably Petite Plants for Fairy Gardens

21 Adorably Petite Plants for Fairy Gardens

Color is always nice, but scale is everything when choosing miniature garden plants. Peruse our favorite picks for fairy gardens and terrariums.
13 Colorful Nectar Plants for Pollinators

13 Colorful Nectar Plants for Pollinators

Create a gorgeous, pollinator-friendly garden by including these nectar-rich plants.
Is Coleus a Perennial or Annual? Here's How to Grow It Both Ways

Is Coleus a Perennial or Annual? Here's How to Grow It Both Ways

Is coleus a perennial that comes back every year? That depends on where you live and how you care for it. Use these tips to enjoy coleus as a colorful perennial or annual plant.
How to Plant and Grow Ranunculus

How to Plant and Grow Ranunculus

Ranunculus are favorite flowers for weddings, arrangements, and gardens. Here's how to plant and grow ranunculus.
How to Plant and Grow Glossy Abelia

How to Plant and Grow Glossy Abelia

This guide on how to grow glossy abelia includes essential planting and care tips such watering, fertilizing, and pruning needs. You'll also find popular types of abelia to grow and pretty companion plants for this flowering shrub.
Hydrangeas Not Blooming? 7 Reasons Why and How to Fix the Problem

Hydrangeas Not Blooming? 7 Reasons Why and How to Fix the Problem

Hydrangeas not blooming can be a frustrating problem for gardeners. These straightforward tips will promote tons of long-lasting flowers.
10 Best Sweet Potato Companion Plants for Larger Harvests

10 Best Sweet Potato Companion Plants for Larger Harvests

Mix and match these sweet potato companion plants in your vegetable beds for pest-free crops and easier gardening.
How to Harvest Mint, Dry Mint, and Store Mint

How to Harvest Mint, Dry Mint, and Store Mint

Learn how to harvest mint to keep plants more manageable and gather fresh mint leaves for cooking, drying, and storing!
How and When to Harvest Radishes at Their Peak

How and When to Harvest Radishes at Their Peak

These easy-to-follow tips will help you figure out how and when to harvest radishes for the best flavor and size. Plus, get troubleshooting advice if your radish roots aren't developing properly.
How and When to Start Tomato Seeds Indoors

How and When to Start Tomato Seeds Indoors

Find out exactly how and when to start tomato seeds indoors so they'll be ready to transplant into your garden in spring.
Tillers vs. Cultivators: How to Choose the Right One for Your Gardening Tasks

Tillers vs. Cultivators: How to Choose the Right One for Your Gardening Tasks

Learn the differences between tillers and cultivators and the tasks they're best suited for.
Here’s What Not to Put in Compost to Avoid a Contaminated Bin

Here’s What Not to Put in Compost to Avoid a Contaminated Bin

Composting is a simple way to turn your kitchen and yard waste into food for your garden. But some of these items should never be in compost.
Easy Lawn Repair for Patchy Grass Using Seed or Sod

Easy Lawn Repair for Patchy Grass Using Seed or Sod

With a bit of grass seed or sod, lawn repair is easy, and you’ll soon have a lush green carpet again.
What Are the Tiny White Bugs on Your Plants? 4 Common Pests They Could Be

What Are the Tiny White Bugs on Your Plants? 4 Common Pests They Could Be

Tiny white bugs on plants in your home or outdoors can be a big problem. Learn how to identify and get rid of them with this guide.
How to Spot 5 Common Plant Diseases and Keep Your Garden Healthy

How to Spot 5 Common Plant Diseases and Keep Your Garden Healthy

Protect your plants from the most common diseases. Learn to recognize the symptoms and how to prevent these diseases in the first place.
How to Landscape with Rocks and Stones in Your Yard

How to Landscape with Rocks and Stones in Your Yard

Decorative rocks and stones add another element of nature to your yard, whether you grow hydrangeas, tulips, or cacti.
Landscape Planning Tips From Start to Finish for a Perfect Yard

Landscape Planning Tips From Start to Finish for a Perfect Yard

Even if you're a beginner, these simple landscape planning tips will take the mystery out of designing your yard's ideal layout.
10 Native Alternatives to Invasive Plants Growing in Your Garden

10 Native Alternatives to Invasive Plants Growing in Your Garden

Use native plants in your garden instead of popular invasive landscape plants: See a list of common invasive plants, plus native alternatives to plant instead.
Your Seasonal Lawn-Care Schedule for the Midwest

Your Seasonal Lawn-Care Schedule for the Midwest

Use our lawn-care schedule to help you maintain a beautiful yard all year long. You'll learn exactly when to mow, aerate, fertilize, and overseed.